Showing posts with label terrain. Show all posts

25 February 2024

Working on some terrain

 Something a bit different - 28mm terrain:


Assorted conifers from Bachman, tree bases from Charlie Foxtrot, foreground ruins, runestone, and stela from Fenris Games, and the dark grey resin buildings in the background from Fogou Models.


Not much else getting done as cascading crises at work keep me otherwise occupied!


.

09 July 2016

Trees, part 3

And, now for some experimentation with the trees.  I found an old plastic sign that looked perfect for a base:


The sign is approximately 8" x 11".  It is fairly thick, but can still be cut be scissors.

These are the trees that I am playing with first:
 

Little did I know that there would be a secret in the selection of these trees...


Here are a few pics taken as I tried to arrange the stumps to be eye-pleasing yet game-worthy:


I settled on the last pic as I thought the others were too dense for easy game-play.

I rounded off the corners and glued the stumps down to the pre-painted side:


Just needs some filler to smooth the stumps into the base and flocking.

And, here is what the nearly finished clump of trees looks like with a Crann Tara musketeer and a Minden mounted officer shown for scale:
 

I think that it looks about right, and the spacing should allow the troops to move around without too much trouble.


The surprise that I found in the package of trees was not expected - the trees and their stumps are not all the same size.  There are two different sizes of mounting pins on the trunks and their associated stumps in the package.  It is not a major problem, but a bit of a surprise.  I wonder if the newest package of trees - smaller than these - has the same feature.


.

22 February 2015

TROLLLLLL!!!

Sometimes, one finds the unexpected during completely mundane actions...

My lovely wife and I were doing the usual shopping chores yesterday.  After finding a few necessaries at the downtown Seattle Bartell's (drugstore chain), we stumbled upon a most unique, and very inexpensive (only $3) find:


The Fremont Troll (Wiki article here) is a fixture of Seattle tourism, and a pretty nifty place to visit.  I had no idea that there was a Chia version!  Now, I am not interested in the Chia part, but the troll itself...


The seeds will be put away just in case of some future need.  The troll will make an excellent and unusual terrain piece.  It would be great for any scenarios based in Seattle - Shadowrun would be an obvious choice, as any modern or post-apocalyptic game set in Seattle.

I will be using my Troll for my fantasy games, including Tékumel.  Could it be the likeness of a deity, even, perhaps, She Who Must Not Be Named?  The VW in its left hand is a bit small for a tubecar, but it could be an air car of the Ancients with a bit of embellishment.


One last pic:


First pic of the Troll out of the box.  It is approximately 7" wide, 5" deep, and 4" tall, which scales very well with 25/28mm figures, and would be a major terrain feature for 15mm.  The clay structure might pose a problem for painting - I bet it is quite porous - and that hole in the top of the head will need to be plugged.

More pics later!


.

23 July 2011

Trees, part 1

No gaming table should be without trees.  And there is a multitude of good-looking pre-made trees out there of many sizes.  But, being short of funds and always desiring a unique look to my projects, I am going to try and build my own.


This is the base material for the trunks/branches.  These are cotton pipecleaners, not the nylon ones from the craft store.  I bought these many moons ago, and they have been sitting patiently in a box for just this moment.


Contents of the package.  There are 32 of them in each package.


Construction of the trunk is simple - just twist three of the pipecleaners together, leaving enough at each end for roots or branches.


These are made with six pipecleaners, mostly to give more branches and to make the trunk bigger.  I wish I had included the scale for the pics - maybe next time.


I cut approximately 1 inch off each of these pipecleaners prior to twisting to make some slightly shorter trees.


The next step is to coat the trunks and branches with some modeling paste to stiffen the structure a bit and cover up the obvious nature of the construction.


.

01 October 2009

Halloween terrain bits

Feawin and I were at the local store the other day, and stumbled across their Halloween display. One item caught my eye immediately:


These are supposed to be sprinkled across a table for a kid's Halloween party, but I think that they will make great terrain bits. They are a bit big - the skull piece is just over 1" long, but for fantasy games they will be just fine for an ancient battlefield or graveyard of giants! 25 pieces in all - skulls, rib cages, hand-wrist-forearm, feet, and thigh bones. The store we bought these at (we grabbed two) is notorious for overpricing, so these should be available for much less money.


.

25 May 2009

Base basics, part 2

I finally had a bit of time to experiment some more with my basing scheme. My typical base color, Apple Barrel 'Territorial Beige', is too dark in my opinion, so off to Michael's we went to find something more suitable. Feawin and I looked at several colors, and in the end we picked 2 - Americana 'Fawn' and FolkArt 'Camel'.


And, here they are - 'Camel' on the left, 'Fawn' in the center, and just for comparison 'Territorial Beige' on the right. To my eyes, 'Camel' is too yellow for my purposes, but 'Fawn' looks like a winner.


This side-by-side comparison confirms that opinion. I do like the comtrast between the 'Fawn' and the 'Territorial Beige', and I might use the 'Territorial Beige' and the base color for any rocky formations when I finally start making some terrain pieces.

One more comparison:


This is a heavily fooled-around-with but still poor pic of the test bases on the felt that will be the terrain cloth for my first games. 'Fawn' actually does look good on the felt, just not in that pic!

After some thought, I decided that I would stick with a slight variation of my usual base decorating strategy, which is as follows:

1. After gluing down the minis, paint the base in the selected color - 'Fawn' in this case

2. Once the paint is dry, spread white (PVA) glue on the base

3. While the glue is still wet, sprinkle various types of basing materials on the glue, starting with the most coarse and ending with the finest grain material.

I considered using a different technique, where the base is coated with the rocks and sandy materials first and then inked/painted up to the desired colors - as exemplified on the Olicanalad's Games page - but I am not a very skilled drybrusher, therefore the old technique is the one that will be used.


Here is the array of material I am considering to use on the bases:

1. Crushed walnut shells - I found this stuff while wandering around the local pet store. It is normally used for bird cages, but it should make a great basing material. And, it is cheap - $10 for a 7 pound bag! The size and sharp edges might be better suited to 15mm rubble, but the color is perfect.

2. Woodland Scenics fine tan talus

3. ?

4. Woodland Scenics fine brown ballast

5. ?

6. ?


The ? materials, unfortunately, are just perfect for the job, but I need to hunt around here for some info on what they are! I purchased most of these items 12 years ago or so, and have held onto them ever since. Some were used on other projects, especially 40K minis, but never in a large scale. I do remember buying the ? materials from a now-closed train/hobby shop in Spokane... I should have the package labels here someplace (I'm a pack-rat for paperwork).


This is an example of what I'm trying to achieve. This is the 'Fawn' test piece from above, with various amounts of the 6 jars of materials as shown above. I like it so far; I might add some bits of light green foliage in the future.


.

04 May 2009

Base basics

My initial order of Impetus-sized bases from Litko arrived recently:


These three bags will be enough for 45 Impetus units! These are very nice bases.

I do have another worry - what sort of adhesive should I use? Having 7 to 10 metal minis on one base will get a bit weighty; I can not hope that, even with the 3mm base, the units will always be handled by the base - some one (probably me!) will pick up the unit by one mini and I would prefer that it not break off. I might need to use the hot-glue gun that is hiding around here, somewhere.

The base color is another item to consider. I typically use craft paints for bulk area painting, but my usual base color - Territorial Beige from Apple Barrel - is too dark from the dry scrub look that I want to portray (it works great for a more temperate area), so some new paints will be on the shopping list.


.

15 January 2008

MMORPG, part 4

(I'll start with a *wave* to the people watching this from the West Seattle Blog - a very nice local news source that has a feed from local bloggers)

Slow but sure progress on the WoW front since last time, the shaman is up to lvl 21. Here is a screenshot:


My Tauren shaman is there in the middle, surrounded by water elementals that he just freed during one of his quests. Also shown is Feawin's blood elf hunter and wolf pet.

I also have an idea. One of the more interesting opponents in WoW is the Murloc, intelligent fish-people that do not like the land-dwellers. They live along large bodies of water in small villages, like these:


Here is a typical grouping of Murloc huts, with a couple of Murloc in the background.

And another pic:


One more (this one is altered slightly, since these were taken during 'night' game-wise:


I think that these would make good scenery for my fantasy skirmish games. It should not be hard to scratchbuild some of these huts, and I have some boxes & crates in the bits box to use also.


.

06 May 2006

A little bit of terrain...

I'm starting a quick little project for the tabletop.

Last week at work, we received a new scanner. Now, normally I don't get to play with the new stuff at work, but when I saw the packaging I was mollified, since it had some 'unusual' shapes. After a couple of days, the packaging still had not been tossed out, so I took advantage of the situation and broke off some useful bits from the packaging.


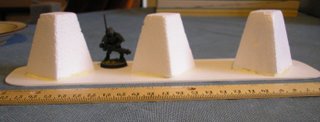
(Stealth suit added for scale)

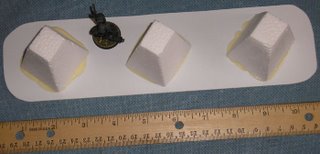
I sanded the bases of the 'teeth' and the sides also, and glued them down to .060" styrene sheet. Once the glue is dry (I used Elmer's Wood Glue, which takes quite a while to dry, but should be stronger than white glue) I'll add some spackle to help pretty up the base, and go from there.


Later this week-end, I hope to take some pics of No. 2 Son's 40K figures...


.